Automated testing with Grunt and Jasmine

On my last post Conway’s Game of Life I’ve used jasmine for testing my code.

Now, I would like to show how to automate the process of running all the tests.  and for this I will be using Grunt (v0.4.5).

This will be more like a recipe because there are already several good tutorials about grunt and jasmine, so if you’re new to Grunt or Jasmine, I advise you to get some basic reading first.

So let’s do this!

1. Because Grunt is built on Node, we have to install node and npm.

2. Open the command line.

3. install Grunt command line by running the following command:


npm install grunt-cli -g

-g will make it global

Note: on version 0.4 grunt was separated in grunt command line and grunt engine. Grunt command line typically is installed globally and Grunt engine locally.

4. Go to the project directory.

5. Install Grunt engine:


npm install grunt

6. Create a package.json. This can be done by hand or automatically using the command:

npm init

This will ask you a few questions and by the end it will create the file.

7. Install jasmine plugin for grunt:

npm install grunt-contrib-jasmine --save-dev

The optional flag –save-dev will save our dependencies on our file package.json

Note: This command will also install phantom.js which is how it runs the tests

8. Create a gruntfile.js with the configuration needed

 module.exports = function(grunt) {
   grunt.initConfig({
 
     // jasmine configuration - indicates the source files, the specs files and vendor files
     jasmine: {
       pivotal: {
         src : 'lib/js/*.js',
         options: {
           specs : 'spec/GameSpec.js',
           vendor: [
              "lib/js/vendor/*.js"
           ]
        }
      }
    }
 });

 // load plugins
 grunt.loadNpmTasks('grunt-contrib-jasmine');

 // Test task
 grunt.registerTask('test', ["jasmine"]);

};

9. Run the tests:

grunt test

And you can check that all tests are passing:
grunt-test

Webucator, a provider of JavaScript training, produced a nice little video inspired on this post. You can watch, step by step, how easy is to test javascript with Grunt and Jasmine.

HTML5 Conway’s Game of Life

I have created a HTML5 version of the Conway’s Game of Life.

The “game” is a zero-player game, meaning that its evolution is determined by its initial configuration and does not require any other input. The “game” is based in a grid with cells. Each cell has only 2 states: alive and dead. There are only 4 rules that determines how the game evolves:

  1. Any live cell with fewer than two live neighbours dies, as if caused by under-population.
  2. Any live cell with two or three live neighbours lives on to the next generation.
  3. Any live cell with more than three live neighbours dies, as if by overcrowding.
  4. Any dead cell with exactly three live neighbours becomes a live cell, as if by reproduction.

You can try it here.

I used javascript, knockout and Jasmine and the source code is available on my Github.


Understanding Javascript Publish/Subscription

One of the most interesting design patterns used on web development is the Publish/Subscribe. This pattern, also known as Pub/Sub, fits like a glove on the browser, mainly because the DOM is event driven, it uses events as its main interaction with API scripts. However, events aren not restricted to the DOM and you can have your own events on your API.

Pub/Sub offers a way to handle communication between various parts of a whole system. In short, subscribers want to be notified when something interesting happens and publishers want to notify, to those interested, that something has happened.
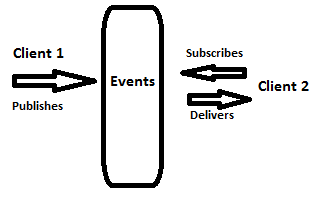
Pub/Sub diagram

Pub/Sub diagram

So this is the idea, a client 1 say for instance “I want to be notified when the data changes” and client 2 says “The data has changed!”.
Now that client 1 has been notified, he can update the data on the page for instance.

Without Pub/Sub, this works as well, the main difference is that the publisher needs to know about the other clients. In this case, after data changes, client 2 needs to call directly client 1, which would sound like “Hi client 1, data has changed!”.
This means client 1 and client 2 are tightly connected. This scenario starts to be complex with the number of clients growing, making the maintenance of your code too dificult. And what if one client is not there or is not right implemented? Will the other clients be afected?

What Pub/Sub introduces is loose coupling, the publisher doesn’t need to know who are the clients or how many are they. Neither the subscribers need to know about publishers or other subscribers. If one fails the other ones will keep working normaly.

On the other hand this decoupling also presents as its disadvantage, mainly because the publisher and subscribers don’t have any guarantee that everything is working, there is no guarantee that subscribers will be notified neither publishers have the guarantee that anyone is listening.

Event though I think the advantages are much more valuable than the disadvantage, however, the Pub/Sub pattern doesn’t apply to every application, and there are situations more suitable than others.

For instance, this pattern is commonly used on MVC applications (or some variation), where the View subscribes to changes on the models, and react properly when the Model notifies about its changes.

Normaly Javascript frameworks and libraries, and not necessarly MVC frameworks, implement this pattern and lets you use it out of the box, for instance, if you are using jQuery you can use Custom Events.

However, I want to show how easy is to implement your own version of Pub/Sub so that you understand even better what happens.

Below you can see my tiny implementation and I hope the code and comments will be self explanatory.


/*
* Pub/Sub implementation
*/

var pubsub = (function () {

 // store events subscribed
 // events = { eventName : [callback1, callback2, ...] }
 var events = {};

 // publish the event with the specified data
 function publish(eventID, data) {

   if (!events[eventID]) {
     return;
   } 

   var len = events[eventID].length;

   while (len--) {
     events[eventID][len](data);
   }

 }

 // subscribe to an event
 // passing the event name and the callback function
 function subscribe(eventID, callback) {

   if (!events[eventID]) {
     events[eventID] = [callback];
   } else {
     events[eventID].push(callback);
   }

   // returns eventID and the position index on the array
   // so that can be unsubscribed if needed
   return {
     eventID : eventID,
     index : events[eventID].length - 1
   }
 }

 // unsubscribe from an event passing the returned data got upon subscription
 function unsubscribe(subscription) {

   if (!events[subscription.eventID]) {
     return;
   } 

   events[subscription.eventID].splice(subscription.index, 1);
 }

 return {
   publish : publish,
   subscribe : subscribe,
   unsubscribe : unsubscribe
 };

}());

And now, a short example of how this can be used. We have a list of items that we can add to the basket and we have two different vies of the basket, a simple one that shows only the total items and a detailed one where shows the items and quantities. When an item is added to the basket, the views will be notified and will refresh the data.


/*
* on DOM ready handle adding to cart action
* demo.js
*/

$(function () {

  // Add an item to the cart
  $('.add-to-cart').on('click', function() {

    //get product
    var product = $(this).prev('div').text();

    // publish event
    pubsub.publish('addToCart', product)
  })
})

/*
* The view that shows the total items on cart
* simpletrolley.js
*/

var simpleTrolley = (function($){

var total = 0,
$display = $('#total-items');

// notification when an item is added to the cart
pubsub.subscribe('addToCart', function() {

  total ++;

  // update total
  updateTotal();
})

// update total items on the view
function updateTotal() {
  $display.html(total);
}

}(jQuery));

/*
* The view that shows the items detail and quantities on cart
* completetrolley.js
*/

var completeTrolley = (function(){

  var items = {},
  $trolley = $('#trolley');

  // notification when an item is added to the cart
  pubsub.subscribe('addToCart', function (product) {

    // save info

    if (!items[product]) {
      items[product] = 1;
    } else {
      items[product] ++;
    }

    // update view
    updateItems(product);
  })

  // update items on the view
  function updateItems(product) {

    // append to the view if item is not in the list
    // otherwise only update quantity

    var li = $trolley.find('li[data-product="' + product + '"]');

    if (li.length === 0) {
      $trolley.append('<li data-product="' + product + '">' + product + ': <span class="quantity">1</span></li>');
    } else {
      li.find('.quantity').html(items[product]);
    }
  }

}());

You can run the Live Demo and also get the source code from GitHub.

I hope that it became clear the advantages of using Pub/Sub and that you now have a better understanding of it, either if you use an already implement version or you want to implement it yourself.

Unity 2D

If you’ve been following my blog, you know that I’ve started with game development a few months ago.

I started with Javascript engines but, this time I tried something different. I started with Unity engine!

Unity 4.3 was launched with a new feature.. the 2D! So, I gave it a shot and I loved it! You really feel that you are working with a professional tool for developing games. I’ve started developing another clone of Flappy Bird that you can play here.


Scrolling background on Canvas

In this post I will show how to implement a scrolling background on the canvas.

Actually this is something very easy to achieve. The trick is that we have to draw the image twice, one for the top of the image and the second for the remaining part.

If you want, you can see the final result here and the source code on my Github page.

We start with the window onload event. We check if canvas is supported, if not we send an alert.


window.onload = function () {
 // get canvas
 var canvas = document.getElementById('canvas');
 // get context
 var ctx = canvas.getContext && canvas.getContext('2d');
 if(!ctx) {
 alert("Your browser is not supported!");
 } else {
 // start
 start(canvas, ctx);
 }
}

After checking that the canvas is supported we start by loading the image.


var start = function (canvas, ctx) {
 // load image
 var img = new Image();
 img.onload = function () {
 // start animation
 animateBg(canvas,ctx, img);
 };
 img.src = 'lib/img/starBackground.png';
}

As you can see, we set a callback to run on the image onload event.

On this event we call our function that is responsible for the animation.


var animateBg = function (canvas, ctx, img) {
 // properties
 var y = 0;
 var speed = 2;
 var ch = canvas.height;
 var cw = canvas.width;

// our loop
 setInterval(function () {
 // draw botom part
 ctx.drawImage(img, 0, 0, cw, ch, 0, y, cw, ch);

// draw remaining part
 ctx.drawImage(img, 0, ch-y, cw, ch, 0, 0, cw, ch);

// increment y or reset y if reached the bottom
 y = y < ch ? y + speed : 0;
 }, 1000/30);
}

In this function, first we get some properties, the Y position of the image (set to 0 initially), the speed of the animation and the canvas size. Next I use the setInterval function to create the animation loop (which is not the best way, but for our demo it works just fine). In the loop, first we draw the bottom and then the remaining part. Finally we reset the Y if we reached the bottom of the canvas.

Oops, too fast? Ok, let just take a look at the drawImage. We are using all the parameters that the function provide to us.


void drawImage(
 in nsIDOMElement image, // the image
 in float sx, // source coordinate X
 in float sy, // source coordinate Y
 in float sw, // source width
 in float sh, // source height
 in float dx, // destination coordinate X
 in float dy, // destination coordinate Y
 in float dw, // destination width
 in float dh // destination height
);

So, for the top, the only thing that changes with time is the destination Y coordinate.

For the remaining part the only thing that changes with time is source coordinate Y, which will be the canvas height – Y coordinate.

And that is all we need to set up a scrolling background!

Instant Handlebars.js book

A few months ago, I had the opportunity to participate in the book Instant Handlebars.js as a technical reviewer.

The book is now on sale on packtpub website. The book covers the following topics:

  • Create and display templates on your pages
  • Extend Handlebars with custom helpers
  • Organize your code with partials
  • Optimize your development environment

The Instant series are a collection of short books, that offer fast and focused guide delivering immediate results.


ImpactJS – how classes work

As you know, in Javascript there is no traditional class structure as on classical OOP languages.

So, how does ImpactJS structures its code? Well, it has a pseudo-class  object, which is the basis for every class we create on the game.

This is based on John Resig’s simple JavaScript inheritance code

Here is an example of how it looks like:


// Create a new class "Player"
var Player = ig.Class.extend({
 name: '',
 init: function( name ) {
 this.name = name;
 }
});

// Instantiate an object of the Player class
var e = new Person('Nuno');
console.log(e.name); // logs Nuno

All classes that are created with .extend() will also have an .extend() method that can be used to create other subclasses.

Inside of extended classes, we can use .this and .parent for scope. And very shortly, this is how ImpactJS structures its code in classes almost as a traditional OOP language.